
Microsoft Setup
To use Microsoft users for RPort authentication you must add and configure an App registration for RPort. This App is created and fully controlled by the RPort administrator and permission for RPort access can be revoked at any time. When users first login to RPort via their Microsoft user, they must allow this app to read their user info.
For a detailed reference on the configuration settings mentioned in this section, see the Configuration Settings guide.
By specifying a required_group_id in the rportd config, user access to RPort can be limited solely to the members of
a specific Microsoft group.
If the permitted_user_list config option is not set or set to false, then rportd will automatically create and add
any user of your organisation (Active Directory) who successfully authenticates with Microsoft Azure AD to the list of
allowed users for RPort. This means users do not need to be setup in advance.
Most steps apply when setting up both web style and device style flows. Where is a step only applies to one or the other than this will be indicated.
If you have two-factor authentication enabled on the rport server, you must turn it off before setting up OAuth. Use the supported two-factor authentications of Microsoft instead.
Make sure you are on the Azure portal home page
https://portal.azure.com/#homeSelect Azure Active Directory from the Azure services section and select App registrations from the left sidebar.Select New registration from the left-side of the top menu-bar Complete the details in the Register an application form. Most likely you’ll want to select the Single tenant option for Supported account types and Web for the Redirect URI. For the Redirect URI, this setting needs to be
https://<your-server-fqdn>/oauth/callback, so that clients can intercept the returned authorizationcode.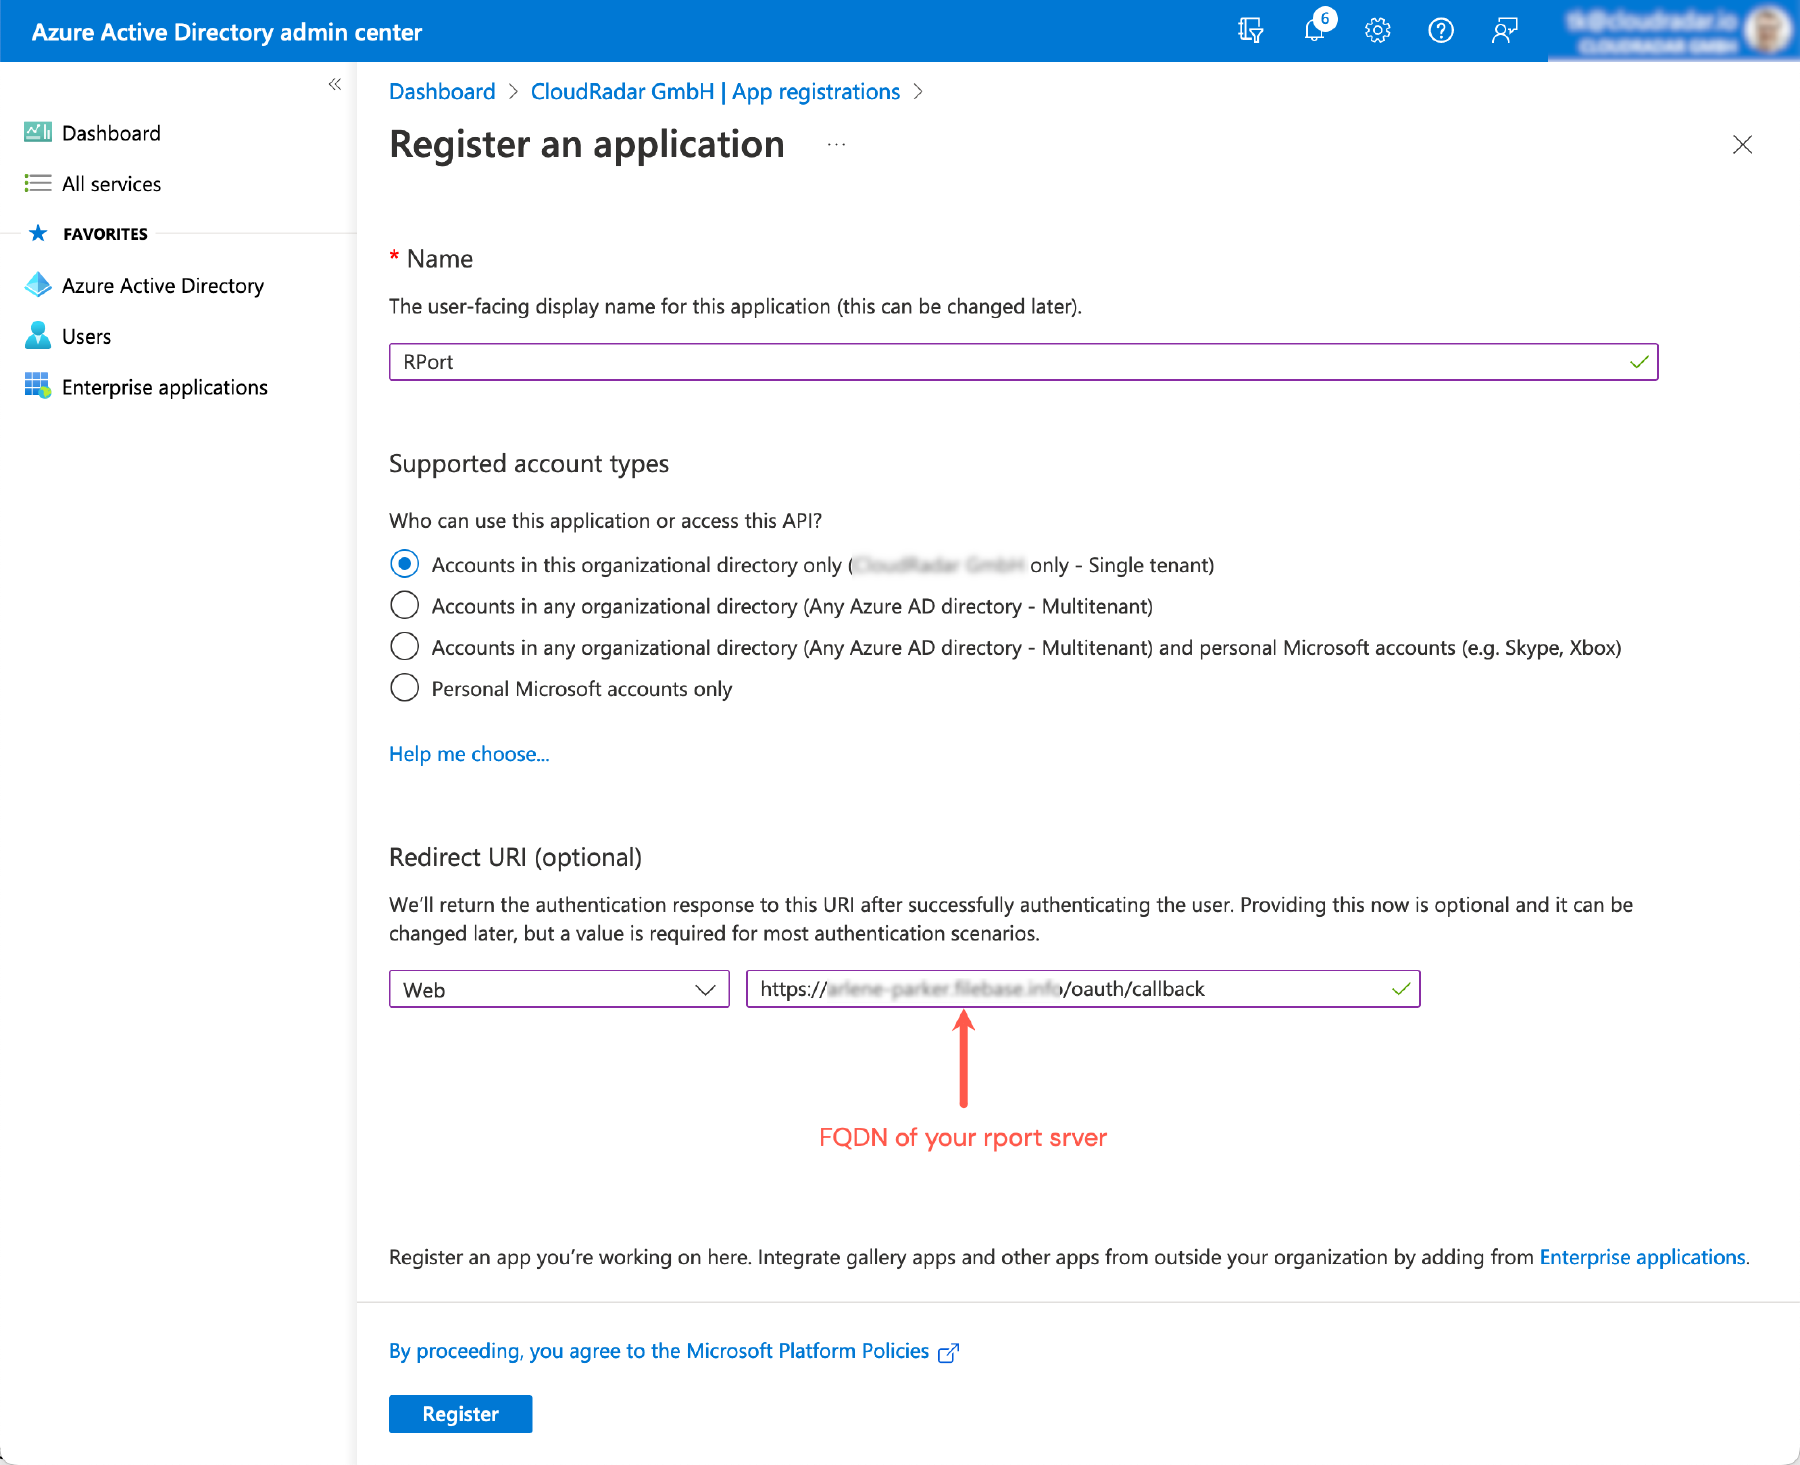
Register a new app for authentication If the device style flow is required (e.g. for the
rportcli) then make sure to switch the Advanced Settings, Allow public client flows to Yes.Click the Register button to register the app. Review the presented details on the screen displayed (titled with your app display name). Note the Application (client) ID. It will become
client_idon your settings
Get the client id


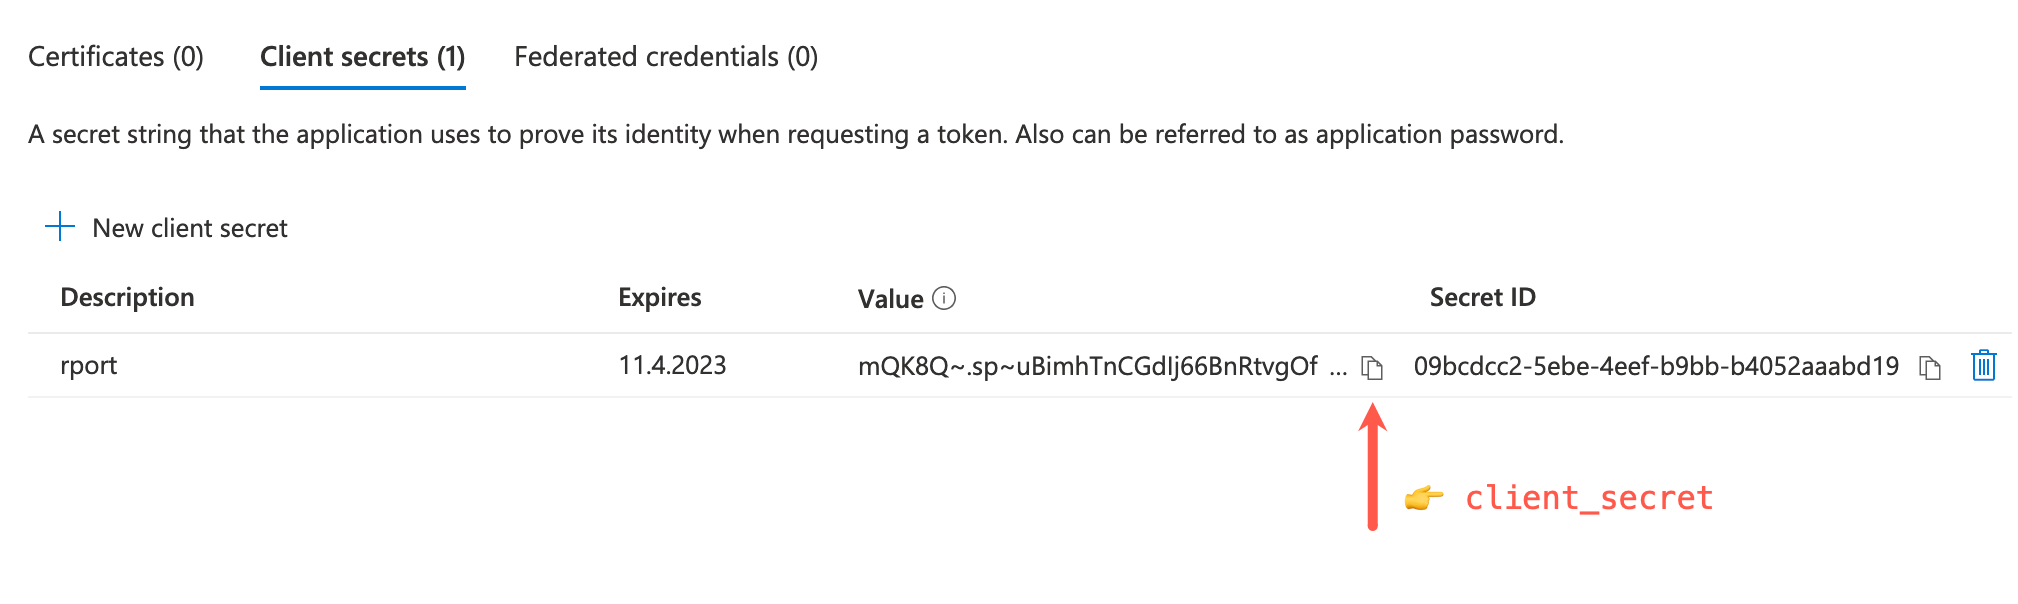
Click on New client secret on the left-side of the Certificates & secrets section.
Make sure the middle option Client secrets is selected and click the New client secret option at the top of the section. Enter a description and Expire duration and click Add
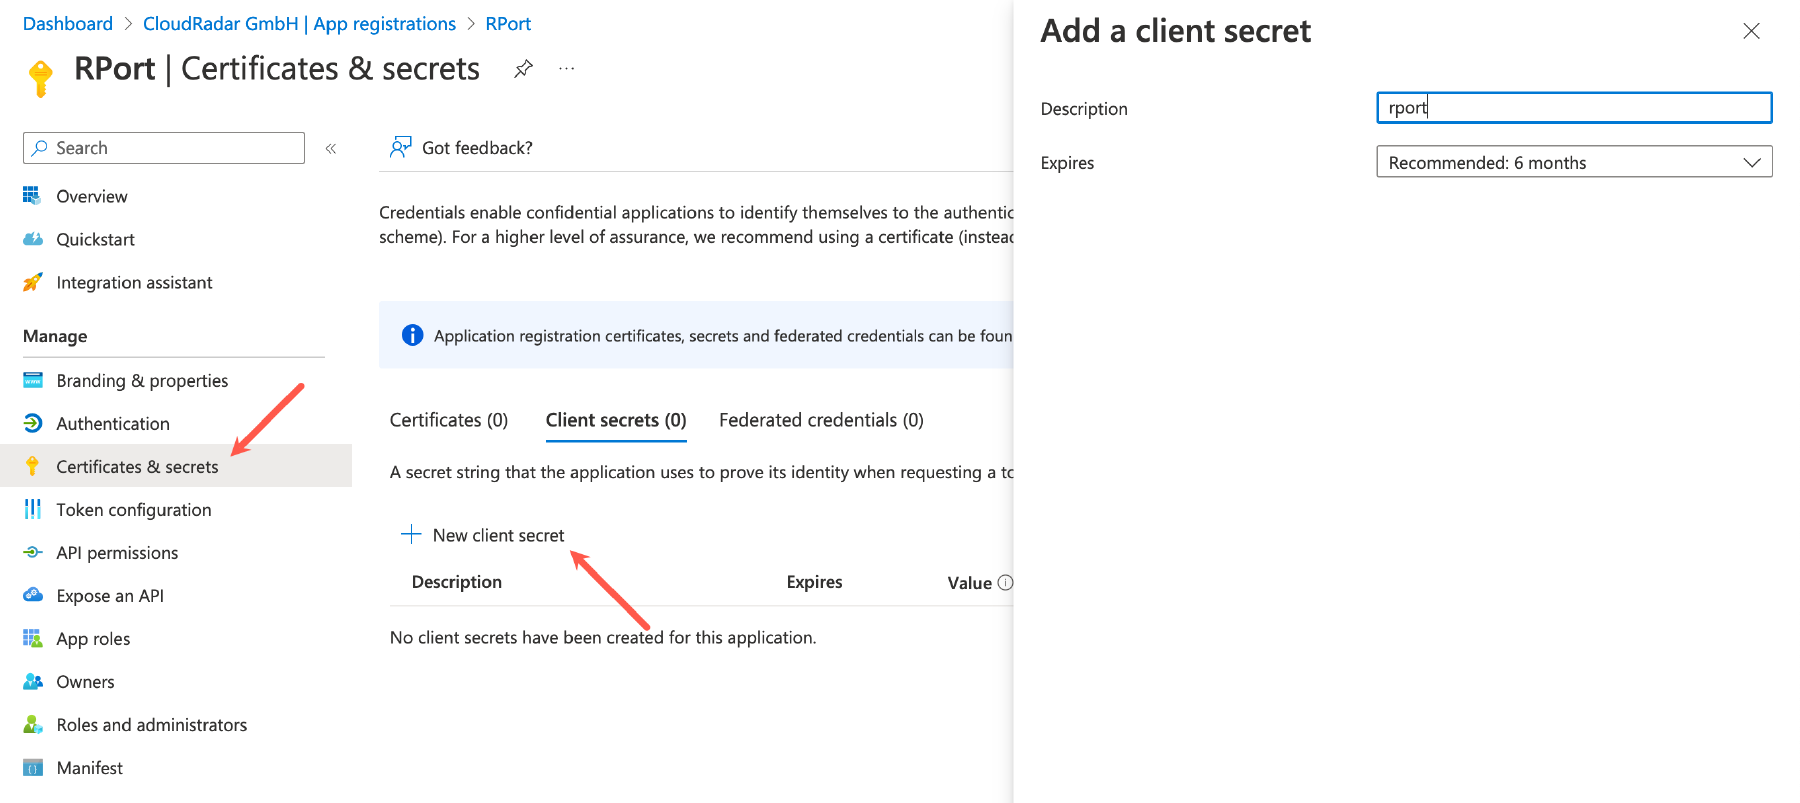
Add a new client secret Ensure to copy the
Value(and not theSecret ID) for the newly created client secret. This values becomes theclient_secretsetting in the configuration file.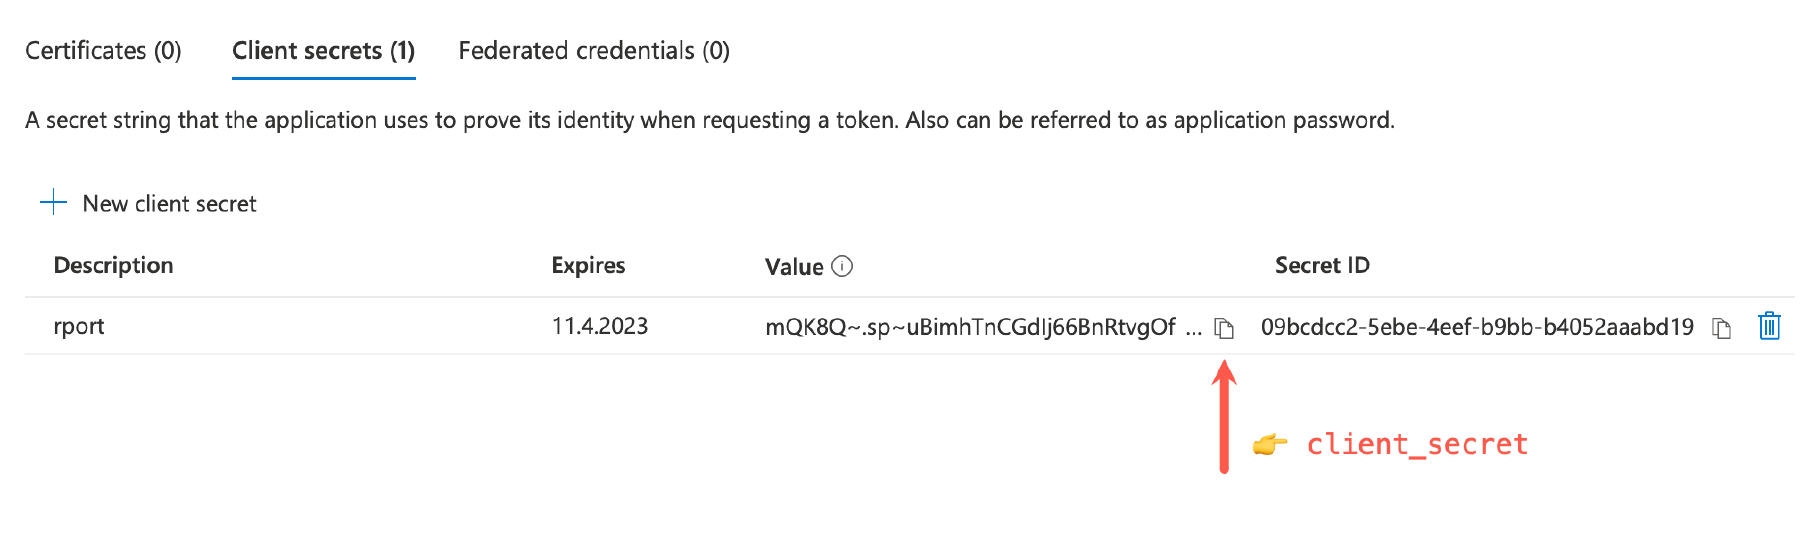
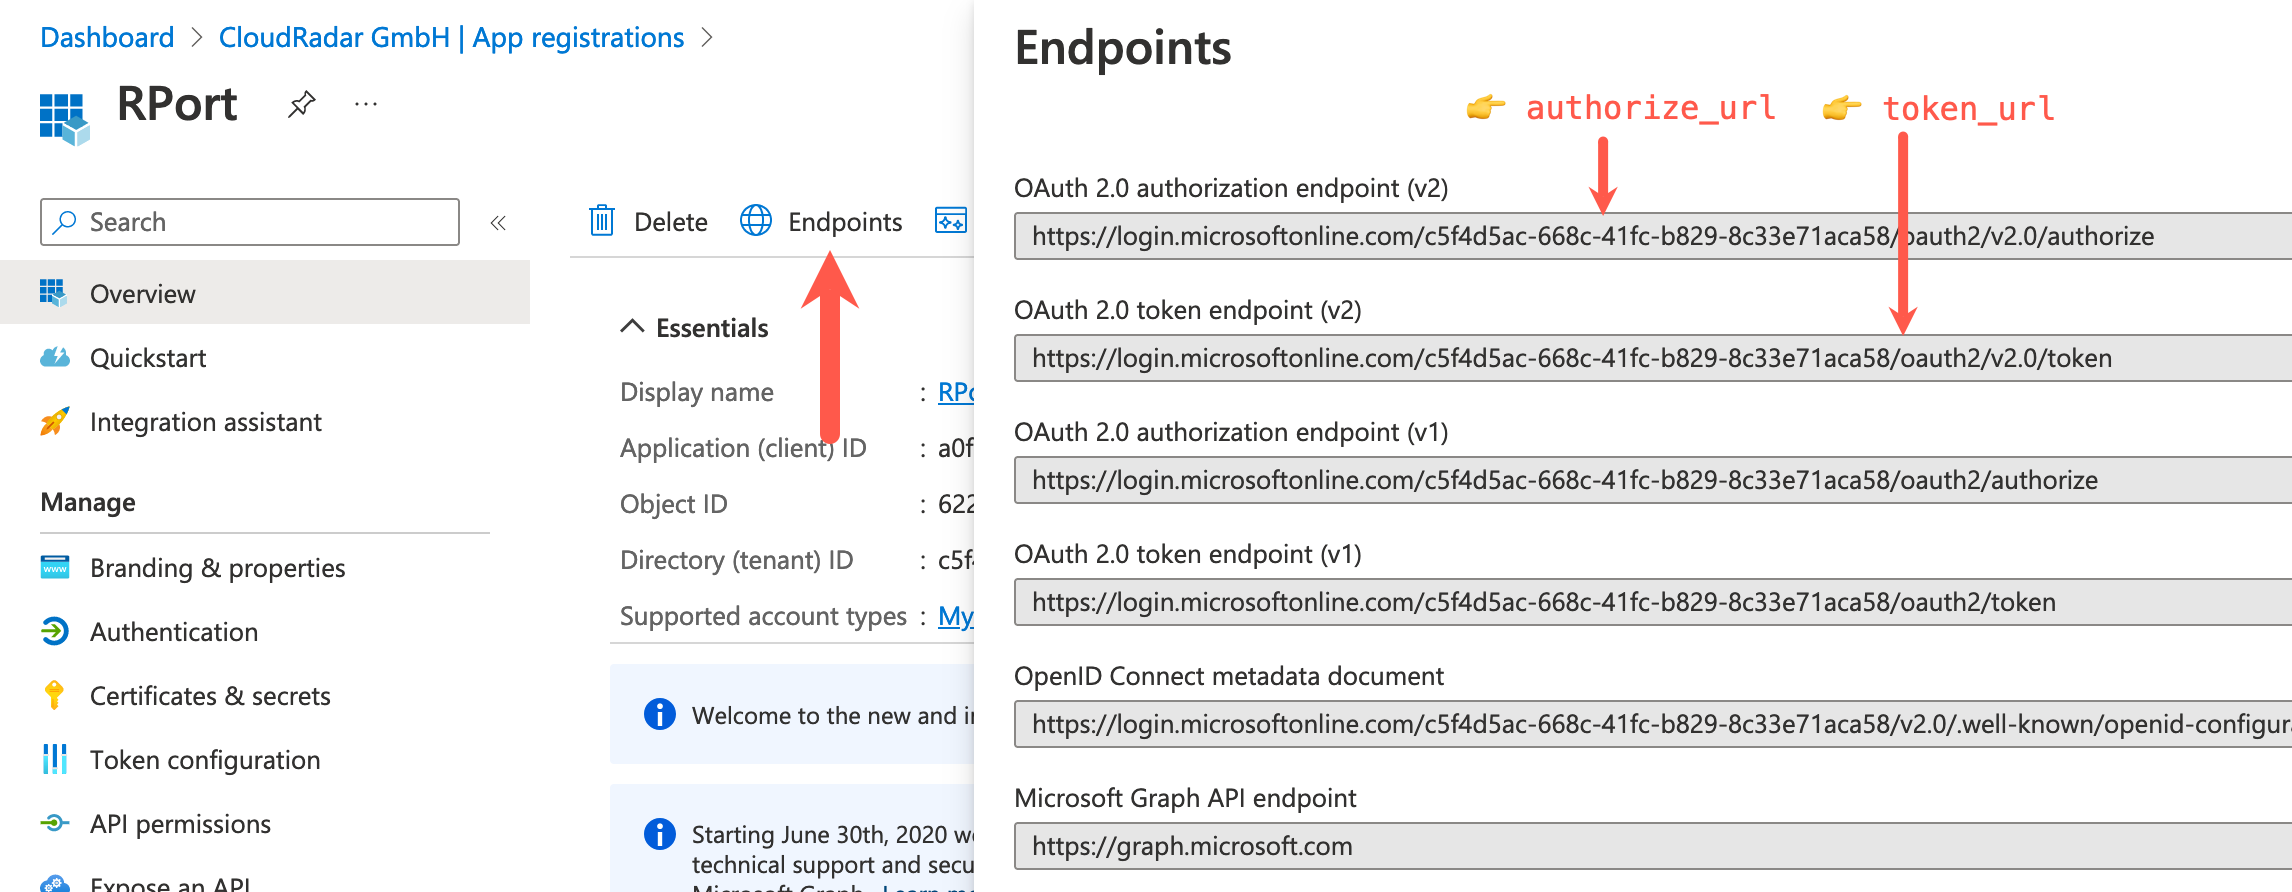
copy the client secret Click on the Overview option at the top of the left side bar to return to the App registration summary. Click on Endpoints in the middle of the top menu-bar. Make a note of the
- OAuth 2.0 authorization endpoint (v2), becomes
authorize_url - OAuth 2.0 token endpoint (v2) endpoints, becomes
token_url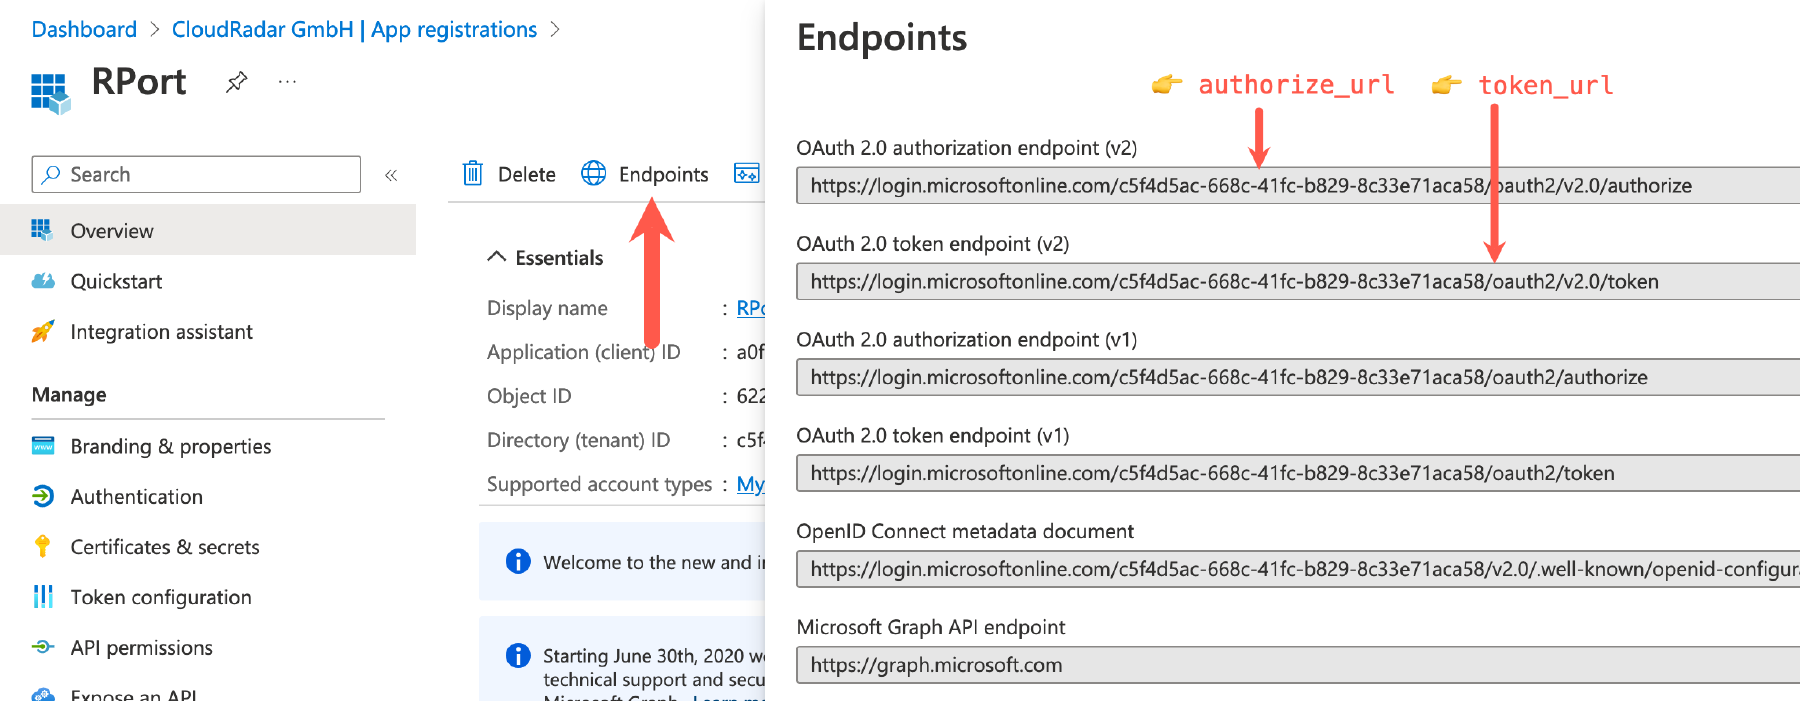
get endpoint URLs
- OAuth 2.0 authorization endpoint (v2), becomes

For configuring the rportd server config file, the following information will be required:
[oauth]
    provider = "microsoft"
    token_url = "<OAuth 2.0 token endpoint (from step 2)>"
    redirect_uri = "<your redirect uri (from step 1)>"
    client_id = "<application (client) id (from step 2)>"
    client_secret = "<client secret value (from step 2)"
    authorize_url = "<the OAuth 2.0 authorization endpoint v2 (from step 2)>"
    # If using the device style flow (OAuth for rportcli) additionally active the below line.
    # Change the last fragment of the URL from 'authorize' to 'devicecode'
    # device_authorize_url = "<the OAuth 2.0 token endpoint (with modification - see line above)>"
Optionally set the rportd oauth access control config parameters as required
Depending on requirements, the following access control config parameters maybe set.
[oauth]
  ...snip ...snap
  # Microsoft group ID of required group
  required_group_id = "xxxxxxxx-xxxx-xxxx-xxxx-xxxxxxxxxxxx"
  ## allow all users within group
  permitted_user_list = false
  permitted_user_match = ""
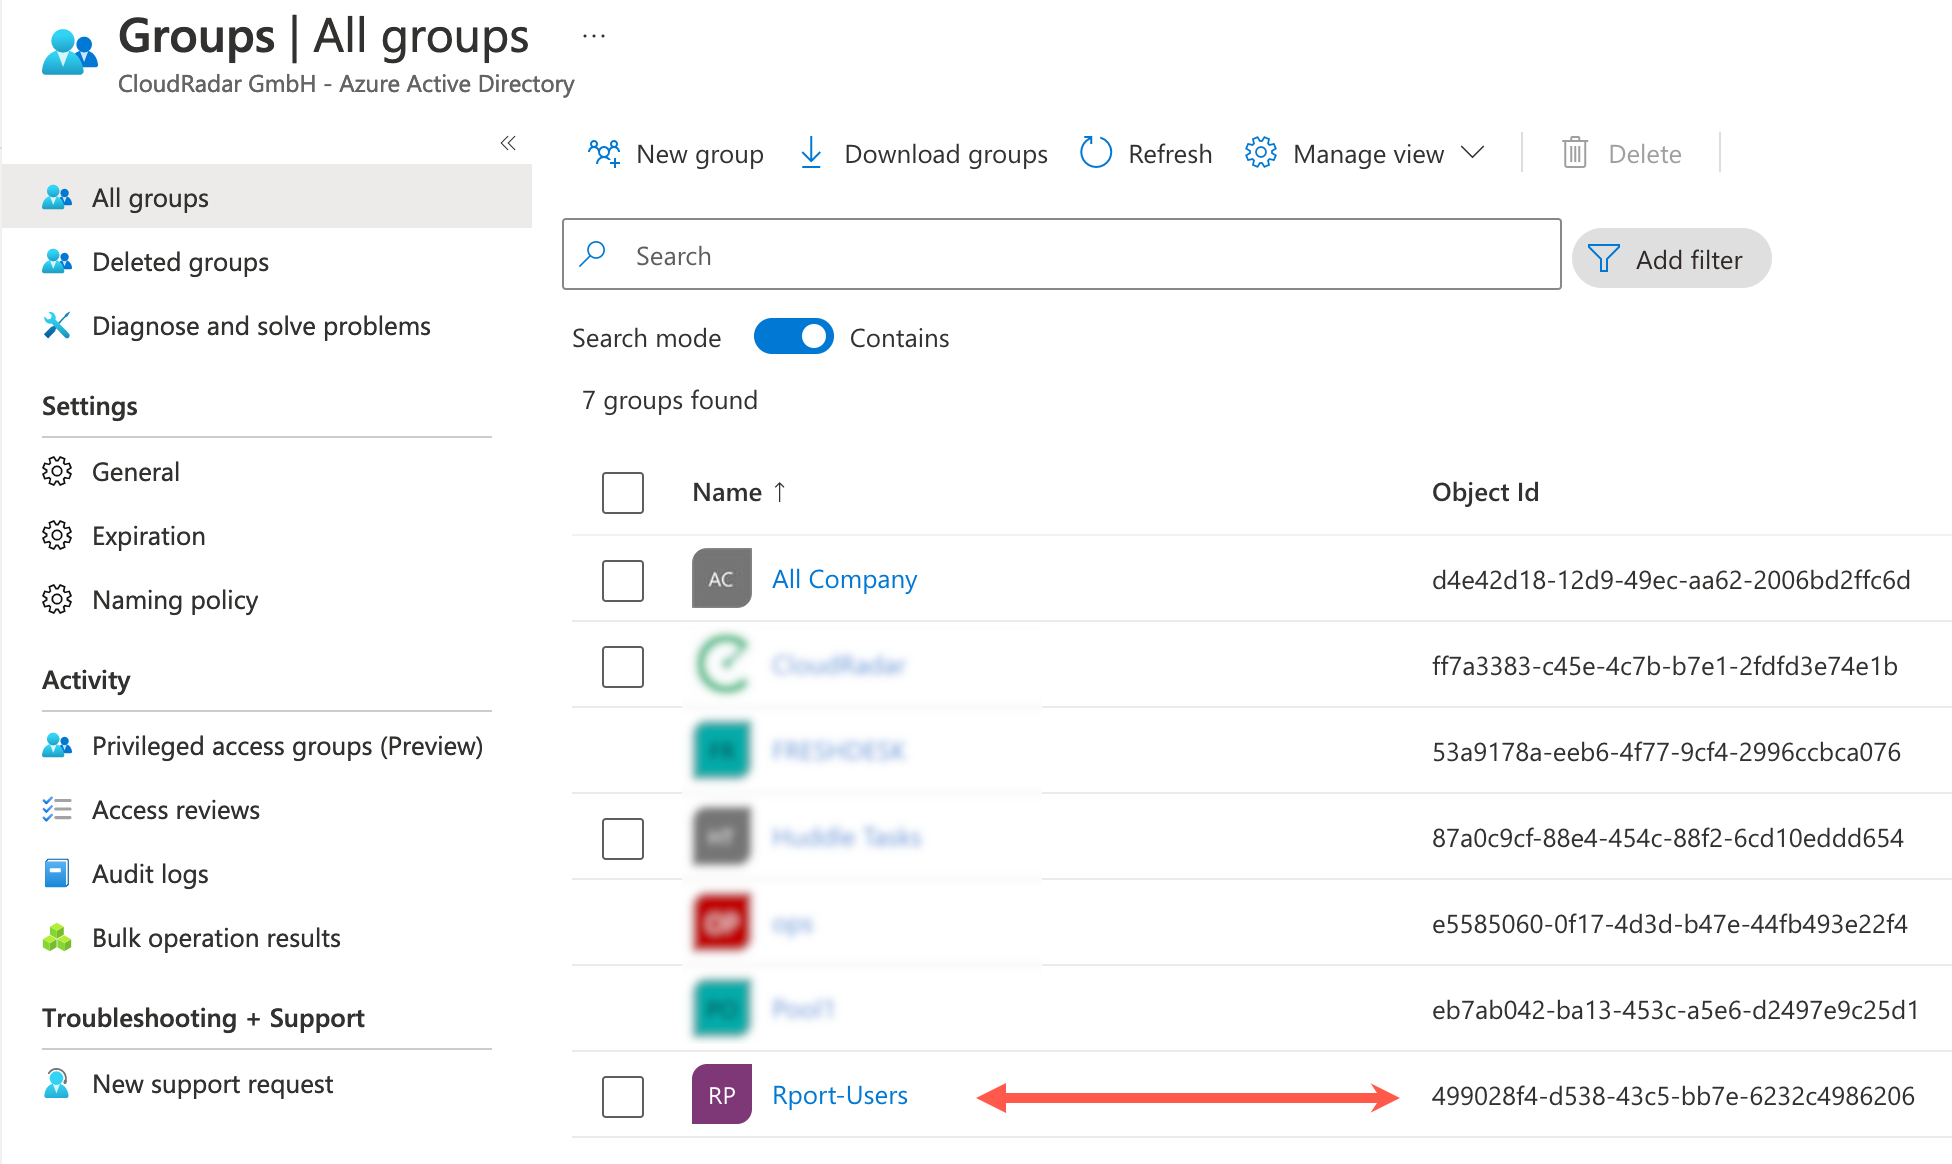
For the required_group_id check, RPort matches against the group id values for which the Microsoft user is
a memberOf. Please see Microsoft Graph
REST List a user’s direct memberships
API for more information. Note that the user must be a direct member of the relevant group and not a transitive member.
The group ID is also referenced “Object Id”.
Always restart therportdserver after any changes to the configuration file.
For the RPort username, RPort uses the userPrincipalName (or mail) property from the Microsoft Active Directory
REST ‘user resource type - properties’
API.
When using the permitted_user_list setting the usernames listed in the RPort API file or DB
(see API Authentication) must match the value of the
Microsoft userPrincipalName field for the user. Note that typically this is the email address of the user.
When using the permitted_user_match setting RPort will first try to match the regex with the
userPrincipalName and then if that fails it will try to match against the mail property of the signing in user.